Caprichia

Life's naturally beautiful.


Leave a comment

Caprichia’s Website Turnover

Hey blog readers!

I know I’ve been away for a long time (apologies, I know you miss me all dearly..) but I had been away travelling for seven months now (whoa dude, whuuut?) and I have two special announcements to make.

The first being the release of my new WordPress website sharing all my unfortunate adventures whilst being on the road. As much as I want you all to be jealous of my travels (cos people LOVE the attention don’t they?) I feel that my readers should still now the side of travelling that super-imposed photos on Instagram tend to miss out. Nonetheless, I don’t regret a single second of it so make sure you check it out and follow the link right here!

Now for the second announcement (my aren’t you guys spoilt..) My two best friends and I have collaborated together on YouTube and created a brand new channel “The Triplets Adventures”. Follow us on our solo travels as we venture to three different locations around the world but still keep in close touch with each other. Distance is no boundary for us! 🙂 So follow and subscribe to the channel right here!

That’s all folks! Feast your eyes and fuel your brains on these yummy new finds and I’ll see you on the other side!

Love Caprichia ~x


Leave a comment

27 Hours of Whirl-Y-Gig

I’m honoured to be part of a community of great people who know how to put on a great night every month. A lot of passion and effort goes into the creation of Whirl-Y-Gig and I hope this video will shed some light on what we do.

For those who don’t know what Whirl-Y-Gig is, here is their website:

http://www.whirl-y-gig.org.uk


(All music and other links can be found on the YouTube video).

Love and light x x x


Leave a comment

Quick DIY Project: Earring / Jewellery Organiser

Image

To the ladies,

I bet you a fiver you keep your jewellery in some kind of bowl and have to spend ages untangling the ones you want to wear. It’s an ordeal right? And you now owe me a fiver.

But it’s okay, keep it. I’m keen to offer up a solution for you guys: A Jewellery Organiser. Looks snazzy doesn’t it! And it’s so easy to make! All you need is the following:

  • An old deck of cards (I found one where most of them were in shreds and had missing cards so no-one will really be using these again)
  • A box where the cards will fit snug into (I used a black ceramic bonsai tree pot)
  • A drawing pin
  • A pair of scissors.

Image


Don’t forget the drawing pin! I forgot to include it in the photo..

  1. Take a card and cut 2 slits on one end (1cm should be fine). They should be quite far apart as you want your earrings to sit nicely apart.

ImageImage

2. Got that! Next step! Stick the drawing pin into the groove of both cuts. This makes a nice hole for the earrings to sit in and prevent them from falling out.


Image

Image


3. Hang up your earrings or necklaces! Boom! You’re done!

Image


Now do the same for however many pieces of jewellery you have. Altogether it looks messy but it it’s an ‘organised snazzy’ kind of messy!

ImageImage


So how did yours turn out? Got any other great ways to organise your jewellery? I’d love to hear it. Share your story with me! ^_^

I plan to post a dreadlock hairstyles tutorial video soon so keep your eyes peeled…

Peace, Love, Turtles ~x


Leave a comment

May Update – Alde Gardens and Budapest teaser

I cannot believe that it’s already June. This is the first time in a month I’ve been able to finally sit down to collect myself and I just clocked that I will be 23 years old in 2 weeks! But I’m not complaining in the slightest; I love being a busy beeee!

So two big things happened last month. The first was a weekend away (17th and 18th) at the beautiful Alde Gardens in Suffolk to celebrate my fifth year anniversary with my other half (hold your horses folks, we’re not married. This is just 5 years of being together. Although we pulled a massive April Fools on everyone this year announcing on Facebook that we were engaged followed by 94 likes, lots of text messages, someone deciding to organise my hen night and a teary voicemail. No-one wanted to talk to us for a week when they found out…….it was great fun.)

Anyways, Alde Gardens is in summary my vision of a hippy paradise. A picturesque campsite built in a quiet village called Saxmundham, Alde Gardens offered a perfect getaway from the hustle and bustle of London life. The campsite is divided into individual tent sites for everyone complete with a communal kitchen, compost toilets and a jungle shower (Yes you read correctly – A JUNGLE SHOWER. More on that later.)

If you don’t want to bring a tent, not to worry. Alde Gardens shows off a selection of eco-friendly accommodation which has it’s own unique vibe. They have 2 yurts, 2 tipis, a gypsy caravan, a treehouse and a cottage. We stayed in the largest tipi for 2 nights and I couldn’t help but feel like Pocahontas dancing around the fire and sending smoke signals. Inside the cosy tipi sits a handmade wood burner which admittedly took us forever to light but the craftsmanship is rather impressive. We were told that this tipi, along with the yurts and cottage, are the only tents lucky enough to boast this incredible piece of work.

Screen Shot 2014-06-02 at 19.30.39

How cool is this tipi?!

Screen Shot 2014-06-02 at 19.28.32  The wood burner.

We found out on day 2 that you can cook stuff on it!


The tipi was also equipped with a double mattress (so no bad backs in the morning from lying on sleeping bags and roll mats!) tea light lanterns, lots of wood to burn and a cowhide rug. What I loved about the campsite itself is the communal kitchen where they offer eggs from the chickens that are allowed to run around the campsite! As much as I despised it in the morning, I can now look back and laugh at how the cockerels would always crow at 6am everyday. For the most daring, there is a jungle shower separated off from the rest of the campsite by three trees in a triangle formation and fenced off with a hook at the top to clip on your camp shower bag. I’m gutted that I didn’t take a picture of it and I did try it once…but the spiders refused to let me shower in peace so I opted for the solar powered showers the next day.


Screen Shot 2014-06-02 at 19.30.27

Tipi view as you enter.

All in all my boyfriend and I had a beautiful weekend there and cycling from one town to the next. Coincidentally it was during the hottest weekend we had this year, and we hope to go back again soon; providing the weather holds up.

“So what’s the other big thing you did?” I hear you say? Well after a lot of contemplating then suddenly just going for it, I finally got two friends of mine to go on holiday with me to Budapest for three nights. So what does this mean? Yep, another video travel journal coming right up. I’m currently in the process of importing all the videos onto my iMovie (looks like it’s gonna be the biggest travel journal I’ve done so far…sooooo much footage to sift through). Editing this is gonna be tough but I can’t wait to get started. My Macbook can’t seem to keep up with me! ^_^

But for now, here’s a picture of me at the famous baths in Budapest.


 DSCN3250

(Ha! Fooled ya! It’s just a bath turned into a sofa at a snazzy café!

Still just as cool.)

~ x


~ TURTLE LINKS ~

Alde Gardens:.

home


Insta-Whut? :.

http://instagram.com/caprichia


Youtube:.

http://youtube.com/user/CapriChia


Leave a comment

Brushing out blunted dreadlock tips

So if anyone has seen my other dreadlock videos, they would know that I blunted 4 of my dreads.

Well today I felt like un-blunting them.

I guess I wanted to make them look more natural and I know that synthetic dreads are usually blunted; they didn’t suit me.

Anyway I’m rambling on so here are some step-by-step photos showing how I brushed the tips out. Note that if you choose to brush out your dreads completely, it would be done in the same way as detailed here. Only difference is I don’t wanna brush out my dreads completely!

Here’s what you need (if you wanna join in the fun!) : 

  • Pair of hairdressing scissors
  • Bottle of hair conditioner
  • A fine comb
  • Towel
  • Water (to wash your dreadies after!)

(I apologise for the low light in these photos. I made this decision at like half 12 in the evening and went straight to business.)

Image

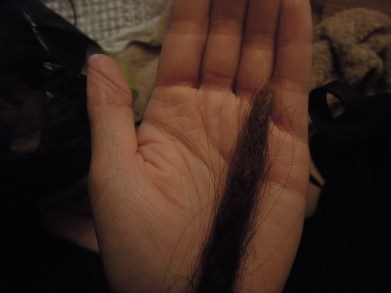
1. This was the last dread I brushed out. It was then I decided, “I should probably blog about this!” So I got the camera out. This is the tip before the process. As you can see it’s rounded at the tip and it just doesn’t suit with the rest of my loose hair. Begin operation!


Image

2. Get your pair of scissors and snip off about 1cm of the tip. It’ll look like a stub but don’t panic. When you start brushing it out, the cut will disappear. But look how weird it looks now haha!


Image

3. Put a pea-size amount of hair conditioner onto your fingers and rub it into the tip. I know people say that dreadlocks and conditioner should NEVER go together (obviously because conditioner detangles hair) but you need to do this here because the conditioner acts like a lubricant (hehe) to make it easier for the comb to run through.


Image

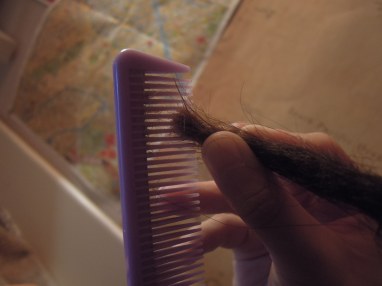
4. Wedge the teeth of your comb into the stub (like in the photo) and move it up and down in a sawing motion. This should help work the conditioner deep into the dread and eventually the hairs will start to separate.


Image

5. Once you’re sure some of the hairs have separated, then you can start combing in the direction your would normally comb hair (I’m sure I don’t need to explain that further).


Image

6. Keep brushing to however much you want undreaded; I brushed about an inch out. As you comb you will hear a lot of hair breaking. This is perfectly normal, but if you have been looking after your dreads well then this shouldn’t have an impact on the final condition of your hair. I’m so glad I have strong thick Asian hair! 😀

If you need to top up on conditioner, go for it! But only apply a pea-size at a time, massage into the dread then continue combing it out. If you’ve decided to comb the whole thing out then put as much conditioner as you see fit.


Image

7. Always stop and check if you reached your desired length. Mine looks like a fine paintbrush 😀 Now for the important bit: WASH THE TREATED AREA WELL. Use warm water and rinse out every single essence of conditioner out of your dread. If you leave it in there, it may continue to undread itself or, worse, build up mouldy residue within the dread and you would have no choice but to cut it off – not cool.

So when you’re sure the conditioner is banished off the face of your dreads, dry them with your towel. I’m not so fussed on hair drying them as the water usually runs off the tips but hey, there’s no harm in making them bone dry if that’s what you prefer.

The next day……

DSCN2833

DSCN2839

Tadaaaaa! I have 4 paintbrush looking dreads now! 😀 Really happy with the way they turned out. I like how they now blend in nicely with the rest of my hair.

Now I know what you’re thinking – “How did they turn blonde at the tips when you started off with brown hair??”

Well I’ll tell you…when I dreaded my hair a year ago, I had ombré hair and then dyed my hair back to brown. Then I completely forgot about it so you can imagine how surprised I was when I found the golden goodness hidden deep within the dread (I guess the brown dye didn’t quite reach inside the dread). It’s like peeling back tree bark to reveal the pale inside ^_^

So are your dreads blunted and you’ve decided to un-blunt them? Share your story with me!

Or better yet, tell me a funny dreadlock story.

Yeah that’s probably a better idea.

Peace Love and Turtles!

~ x

p.s. Look what I found in a random folder, a photo of my dreads when they were only 3 days old.

3 day old dreads

Looks rubbish right? But stick through them, love them, nourish them and they will grow up big and strong like their mama! (Or papa, I’m not sexist.)


Lagos, Portugal

Leave a comment

Lagos, Portugal

So I got back from Lagos yesterday morning (by one of them crazy ass early morning flights..)
We were there for 3 nights to celebrate my dad’s birthday, he reached the big 50 on Wednesday ^_^ He seemed to enjoy the surprise holiday gift from us..

Will get round to editing the footage next week! In the meantime here is a photo of me with our helpful guide, Nuno, who was also so kind enough to sort us out with a taxi to take us back to the airport home! 🙂 Special thanks to him and everyone else from Days of Adventure for making our trip super special awesome! Cannot decide which activity was better, kayaking or quad biking…!

Can’t wait to start editing!!!


~ TURTLE LINKS ~

DAYS OF ADVENTURE

Home

INSTA-WHUT?
http://instagram.com/caprichia

YOUTUBE
http://youtube.com/user/CapriChia

~x


Leave a comment

Purple tonight @ Inspiral Lounge, Camden Town

Want to surround yourself with good people tonight? Fancy a bit of a boogie? Do you like glitch hop, drum n bass, dub, house or anything along those lines? If you’re still reading, well done 🙂 keep reading.

Come on down to a night of positive raving at the Inspiral Lounge (Don’t worry, they’re a vegan cafe!) Starting at 9pm til late, entry is free and is in support of Thames Reach. So any donations are welcome or if you fancy buying any goodies from their beautiful “Snazzy Stuff” shop, look out for my home made tote bags in support of the event. I’ve only made nine so be sure to grab one of these bad boys fast before they’re gone forever! (…until next time).

ImageImageImageImage,ImageImage

Can’t make it tonight? Not to worry! Purple will be hosting many more events in the future featuring more live DJs and happy people. 

But come down tonight! ^_^


~ TURTLE LINKS ~

Purple event page: https://www.facebook.com/events/666167523426088/

Inspiral Lounge: http://www.inspiral.co/events/purple-3/

Insta-whut? : http://instagram.com/caprichia

Youtube: http://youtube.com/user/CapriChia

Â